Image

Image
Photography

Image

Image
Home

Image

Image
Garden

Create: Tacky Christmas Sweater

Its that time of the year! Temperatures are {finally} cooling waaay down and the twinkle lights have appeared… ugly Christmas sweater parties all around!

My group from work is darting out early today to celebrate in Tacky Sweater Style.

sweater card

The search for a Christmas sweater was on – I looked high and low at Goodwill and the local thrift stores but nothing really fit my fancy. Everything seemed – okay – but a tad pricey. $15 for a used sweater that smelled like smoke – not my thing.

Then it hit me – Walmart is full of tacky! {granted I am a walmart shopper but you can sure find some tacky gems in that place}

IMG_8508IMG_8511

Enter men's t-shirt and a women's turtle neck. For that same $15 price tag, I was able to get never worn tacky!

The sweater vest is a screen print and I felt like it needed just a little more pizzazz.

IMG_8509IMG_8510

When I first was thinking through how to adorn this gem I thought I would sew things to it so that I could easily cut them off… you know incase I wanted to wear it again… what?? After that craziness left my head I was able to think clearly and grab the glue gun.

IMG_8517IMG_8518

And behold… tacky {new} Christmas Sweater at its finest.

IMG_8536IMG_8538

The ornaments and candy canes are from the dollar store – one package of each {both were leftovers from another project}

IMG_8542

IMG_8537

So there you have it – a tacky sweater at its finest. Now lets cross our fingers I win that prize!

Anyone else throwing on a less that ideal dud for a party??

0

Handmade Christmas: Cornhole

This Christmas is going to look a little different in my family. Instead of spending a lot on gifts we decided to give above our normal tithe to our respective church's and MAKE our Christmas gifts.

Thinking of what to MAKE your family is no easy feat.

Cornhole is a crowd pleaser but costs a pretty penny to buy. It seemed fairly easy to make so I thought it would be the perfect DIY Christmas gift. I may or may not actually give this away. I like it too much…

IMG_1950-001

Here is the pin I followed which will give you much more detail than I can but I will show you a few tweaks we made when building ours.

This project took about 2 hours in its entirety and the supplies ran me $35! Not too shabby

IMG_1930

First stop was Home Depot for the supplies:

(4) 2X4 – make sure you check them for warping

(2) 1/2 thick 2X4 sheets of MDF – the tutorial says plywood but that is much more expensive

(4) 4 in 3/8 Carriage bolts

(4) 3/8” washers

(4) 3/8” wing nuts

I also used a nail gun and wood glue. You could use wood screws instead.

IMG_1936IMG_1937

Since I bought two 2X4 sheets of MDF I measured my frame accordingly. As you can see I glued the edges and then shot some nails in with the nail gun. This keeps you from having to use clamps and takes away screwing in wood screws.

After the frame was put together it was time to top it with MDF. Again with the wood glue..

IMG_1938

Once I had glued the top on I added some more nails to hold it in place until the glue dried. I will go back over these with wood filler before I paint.

Next up – the hole

The hole should be 12” from the side and 9” from the top. This will give you the center of your 6” diameter circle.

Here are two ways to create a circle if you don’t have a compass

IMG_1939IMG_1941

I measured to the center of the circle (using the measurements above) and then nailed in a small nail in that spot. I expanded the measuring tape to 3” (the radius of the circle) and used the nail as a guide when turning my measuring tape. As long as you keep the measuring tape hugged against the nail you get a perfect circle.

The other was is to cut a piece of wood 3” in length and drill a hole for your nail. *** the length (3”) should be measured from the hole***

IMG_1942IMG_1943

Again have the nail on the X (still same measurements from above) and put the pencil at the top of the wood and spin in a circle.

I drilled a large hole in the circle as a starter for the jigsaw and went to town.

IMG_1944IMG_1945

The jigsaw was tricky to keep in perfect alignment with my sketched circle but any inconsistencies can be cleaned up with sand paper.

The legs:

I wish I could tell you an easy way to make the legs but it takes a bit of time. The directions I pinned give you as much info as I could

IMG_1947

A few tips for the legs: Round with the circular saw instead of the jig saw and then sand! The directions say to stand the leg up next to the scrap piece of wood when drilling the hole for the carriage bolt. We found it easier to lay the leg down (with the curved end against the scrap wood) and drill your hole. This keeps the leg from moving around when you are trying to drill your hole.

The ends of the legs were cut at a 45 degree angle to set flat on the ground.

Next up – prep and paint!

IMG_1948

If you follow between these instructions and these you should know everything you need.

Anyone else making Christmas gifts this year?

0

Fight like a Hogan

Today I woke up aching and have been complaining about a pinched nerve in my shoulder all day.

Its annoying and uncomfortable but that’s all. Its not life threatening, it doesn’t require special doctors, or even surgery.

After seeing the story below on another blog I clicked over to Facebook to read their story myself.

This beautiful family has seen it all – two kids with congenital heart defects and a mother with oral cancer that has hit them twice. Now they are waiting on another biopsy to see if her cancer has returned for a third time. If so she will undergo chemo to shrink the tumor but not will cure her of this cancer.

Here is their story in her own words

My name is Melissa Hogan. I am happily married to my husband, Jeremy Hogan, since March 15, 2003. My husband is the assistant superintendent at our local school and I am a paraprofessional at the school also plus in back in college to earn a nursing degree.

Our journey started when I gave birth to our baby boy, Hestan Brent Hogan, in November of 2003. Shortly after birth we discovered that Hestan was born with many heart defects. Hestan suffers from Hyplplastic Left Heart Syndrome..Transposition of the Great Arteries..Mitral Valve Atresia..Tricuspid Atresia and Pulmonary Atresia. Hestan had his first open heart surgery at 2 days old..a second surgery at 2 months old (after we discovered he was in congestive heart failure) a 3rd surgery at 5 months old..and his last surgery at 3 1/2 years old. He has also had numerous heart catherizations and 1 major surgery to remove an aneurism off his femoral artery that we found a few days after a routine heart catherization. Hestan currently has a valve that is leaking and will have to be surgically repaired but Doctors are going to wait until it is absolutely necessary..because it is a very risky surgery and if not successful could land him on the transplant list. Hestan is a patient at Cooks Children's Hospital in Ft Worth TX..and we have the best Cardiologist, Dr. Lisa Roten..and heart surgeon..Dr. Vincent Tam..in the entire world!


We were told after we had Hestan..that we had a less that 2% chance or any future children of ours having heart problems..it didn't run in our family history and Doctors said it just doesn't happen..its like lightning striking twice!


We found out at 5 months pregnant that our 2nd child...Brynlee Hope Hogan..would be born with similar heart condition as her brother. We were shocked and devastated. Brynlee was born on July 11, 2007 . Her heart condition was listed as a Double Inlet Left Ventricle and Transposition of the Great Arteries. Brynn had her first surgery at 9 days old and her 2nd at 5 months old..and has a surgery coming up this summer (summer of 2011).


Both kids are doing very well and are as "normal" as can be. Hestan is in 3rd grade and is very smart and plays soccer with a soccer league. He does get tired easily and has to rest some..but he knows his limits and accepts them. Brynlee is in dance and ballet classes and loves that! The kids are miracles and blessings to our life's. Its actually been a good thing for our family! The kids have matching scars..go to Dr. appointment together..take the same meds..both have the same limits..and one cant to anything the other cant..it works very well for our family..God knew what he was doing when he put them into our lives! We are very blessed to have been "The Chosen Ones" to be Hestan and Brynlees parents.
I was diagnosed with a rare form of Tongue Cancer in May 2009..at the age of 26. It came a a complete shock..as I am not a smoker drinker or tobacco chewer. I had a surgery in May 09 to remove 1/3 of my tongue then underwent 7 weeks of intense oral radiation at MD Anderson Hospital in Houston TX over summer 2009. I recover well and lived a normal life for a month after treatment..then started having all the same symptoms I had when I first found my cancer. My cancer came back in Dec 09..and was awful. I had a major surgery then to remove almost my entire tongue. Doctors took muscle and tissue from my right thigh to build me a new tongue. I had a feeding tube and trache for a while. I am left with horrible scars..missing teeth..not very clear speech..and trouble eating..but I'm alive. I've been told that if my cancer returns..i have no hope. My cancer doesn't respond to chemotherapy..I've had all the oral radiation the Doctors can do..and I have no options for any further surgery. However..my family is strong believers in God and we have Faith and Hope and just know that I am going to be ok!


I remember being told after Hestan was born "God gives special babies to special people" I believe God chose us for a reason to be parents to 2 such special kids..and I do not think God would give them to me..and then take me away from them! God has a reason for everything..and one day we will see the bigger picture..and until them..we just trust in him and believe in him and have faith in him..we have no choice but to. He has allowed us to witness many miracles..such a blessing!

And to think I was complaining about my poor shoulder.

Take two minutes and click over and like their Facebook page and then start praying – and keep praying for healing in their family.

2

Get Connected : Facebook!

Twenty One Fifty Nine is moving on up in the world. This little slice of internet heaven got a little more in style – we’ve gone to facebook.

That’s right – Twenty One Fifty Nine has its own facebook page.

2159 fb 2

Take a moment and jump over and like our page. This way you will get updates on projects and maybe even a few glimpses of things before they are shown on the blog – like that table below that I found at Goodwill!

2159 fb

I make it a point to also link up all blog posts over there – so if you are ever needing a reminder to check out daily happenings over here, it’s a great place to start.

Currently, I am in the middle of quite a few projects – so bare with me, it might be a little quiet around here, but not for long!!

0

Create : Christmas Table

Our church does this fabulous women's event called Christmas Gathering. Think Oprah’s favorite things church style.

There is a store of various Christmas items to shop through, dinner, and a show with free giveaways.

The dinner tables are open to women to sign up and decorate – incentive being you can reserve it for the night you are coming.

Here are some of the tables (excuse the indoor florescent light pictures)

IMG_8298

Tartan plaid, pine cones, and antlers – be still my heart. I love the mix of outdoors and traditional Christmas décor.

IMG_8299

IMG_8300

Coffee filter flowers, pretty books, and some traditions Christmas items bring vintage Christmas to life!

IMG_8301

IMG_8303

IMG_8302

Christmas Trees were a big hit – easy to place out on a table, takes up decent amount of space, and stores away nicely!

IMG_8306

IMG_8307

IMG_8309

IMG_8311

IMG_8312

IMG_8313

IMG_8315

IMG_8316

IMG_8317

So there you have it – a little centerpiece inspiration!

Do you decorate your table fancy for Christmas dinner? Place cards, anyone?

0

Create: Stumped

I was needing inspiration this morning – you see last night I scored two small (maybe 3 in high and 9 in diameter) wood stumps.

As of late I have really liked the idea of using logs in my décor – I couldn’t tell you why – but I have been very attracted to faux bois (wood grain) and tree stumps of all sizes. Seeing those two (FREE!) stumps sitting there I just knew they belonged in my home.

Here’s the problem though – they are small and there are only two. I usually like to decorate in odd numbers rather than even, so two is throwing me for a loop. Not to mention they aren't large enough to be substantial, such as a side table or stool.

So, what else is a girl to do but search the interwebs for inspiration.

Maybe candle holders? I really like this picture because I LOVE the idea of a potted Christmas tree! That could very easily become a fabulous DIY – fake tree, cheap pot, and some twine!

image

here

Pinned Image

here

Pinned Image

here

Pinned Image

here

Pinned Image

here

Cake plate, painted!!!, mason jar holder, centerpiece – so many ideas! To me, wood really feels fitting in fall and winter décor but these pictures are making me realize it can easily be used year around. Gotta love a good versatile, FREE, find.

Anyone else out there on the wood/stump train? Maybe you have been caught up with my other obsession… pinecones?!?!

3

Create : Christmas Wreath

So - do tell - how was your holiday?

Did Thanksgiving treat you well? I had a great little break from life, enjoying family and time off.

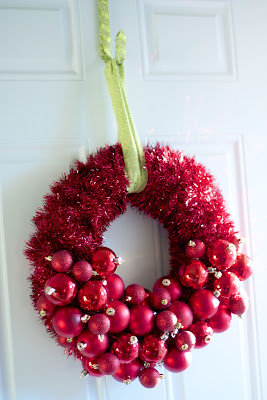
Last night I got an extra kick in my step and decided to decorate for christmas - including a Christmas wreath.


I think it really sasses up my front door. And to think - it only cost me $2.50!

How you ask??

Take on straw wreath from a garage sale at only $0.25 and add to that a red garland from after Christmas sales last year at $1.00 - there you have a good base to start with.

I liked it simple with no ornaments but had left over red ornaments from the Dollar Tree and decided to add them to the bottom of my wreath.


It really doesnt take much to create a fun wreath. Most of the time I am able to find stuff already on hand to dress up my door.

The bold red really pops off my white door and stands out from the street - adding a little christmas cheer to all those driving by!


The wreath holder was pretty plain jane - you know the black metal ones you can get from about anywhere for $3.00 or so. I added some fabric scraps and glitter ribbon to make it look a little more festive - I might actually leave it up for all my wreaths year around. 


The imperfections are what I like most - wayward threads and a little bunching make me like it even more. Gives it a handmade flair - or so I tell myself


Considering the ribbon ( from Michaels) and the scrap fabric were all on hand, this upscale cost me nothing. If you didnt have any of the above at home it might run you about $3.00 - breaking the bank, I know!

So, have you started adding Christmas cheer to your home yet??


0